
San Diego Harbor and Skyline Revisited
 Canon 5D Mark III, 70-200mm f/2.8L IS USM II at 165mm, f/8 for 1/40s at ISO 100
Background
This past May I went to make this same photo of the San Diego skyline with the harbor in the foreground. The conditions were not ideal as there was a significant haze in the air which greatly reduced visibility. You can view the photo and read about it here. During a recent trip to this location a rainstorm had passed through the area the day before and caused all the small particulates to be removed from the atmosphere. As a result, conditions were much better with visibility so great that even the distant mountains were visible. I think you will agree that the photo with clear skies turned out much better.
How to get this type of shot
Like with my past trip to shoot this location, I set up midway up Lucinda Street in Point Loma and pointed my camera due east towards Downtown San Diego. The harbor in the foreground is around 1/4 mile down the hill and the small land mass you can see in the midground camera right is North Island Naval Air Station, around 2 1/2 miles out. Downtown San Diego is around 4 miles east of where I was standing and you can now clearly make out the mountains which are around 16 miles out.
 Canon 5D Mark III, 70-200mm f/2.8L IS USM II at 165mm, f/8 for 4s at ISO 100
The first shot was made around 30 minutes prior to sunset. In this shot both the skyline and harbor are fully lit. As the sun began to set, the harbor went into shadow. I had to wait until the sun had fully set before I was able to shoot the second shot so that both the city and harbor were in the same light. Both images were taken at f/8 since this is the aperture that I could get edge-to-edge sharpness on the lens I was using and also since the closest object was around 1/4 mile away and this aperture gave me sufficient depth-of-field.
Location
November La Jolla Coastal Shoot
 Canon 5D Mark III, 24-70mm f/2.8L II USM at 24mm, f/16 for 1.6s at ISO 100, circular polarizer, 3-stop graduated ND filter + 4-stop graduated ND filter
Background
After finding this gem of a spot after my last trip to La Jolla, I knew it would not be long before I returned. Unlike the previous trip however, conditions were better with high clouds in the sky which I knew would light up near sunset.
How to get this type of shot
I arrived around 45 minutes prior to sunset to give myself plenty of time to set up and stake out my spot. The conditions were great and since it was a weekend, I figured that many photographers would be out taking photos. As it turned out, only a hand full of shooters were out that day.
Although the skies were mostly clear with a nice set of high clouds, the horizon towards the ocean was starting to show the signs of a marine layer coming in. On my last several trips out, due to weather conditions, I was unable to get a nice sunset shot, and the marine layer was looking to spoil it for me during this trip. Luckily there was a break in the clouds and just for a few minutes, the sun peeked through to give the rocks a golden glow.
With the sun still around 25 minutes from setting it was still quite intense since the light did not have to make its way through as much atmosphere as would be the case if it were lower on the horizon. Therefore, the foreground exposed around 6-stops lower than the sky which also had the sun in the frame. I would normally either live with a slightly underexposed foreground or overexposed sky, shoot the scene as a composite of sky and horizon each at their proper exposures or more rarely, shoot an HDR image. However, since I had just purchased a 4-stop graduated neutral density (ND) filter and had another 3-stop graduated ND filter with me, I decided to stack the two filter, something I had never done before. I liked how it turned out and therefore I may use this technique more often.
Location
Fall Colors – Oak Glen California
 Canon 5D Mark III, 70-200mm f/2.8L IS II USM at 135mm, f/2.8 for 1/80s at ISO 100
Background
While other parts of the world are fortunate enough to see the annual changing of colors in their neighborhood or even their own backyards, in Southern California, it often takes a drive up to higher elevations. Oak Glen is one of our favorite spots to go enjoy fall like conditions and partake in pumpkin picking and chestnuts collecting. Many Southern Californians feel the same and during the months of October and November, the area can get quite busy as visitors enjoy the cooler fall like weather and conditions, as well as visit the various small shops selling unique and handmade items.
How to get this type of shot
The photo above was made at the Snowline Orchard in Oak Glen. Several maple trees dot the picnic area at the Orchard and on this day they were radiating bright red and were at the peak of their fall colors. It is quite easy to be in awe at a not-to-often seen subject by Southern California standards and to simply put your eye to the viewfinder and start snapping away. The key to getting a photograph instead of just a snapshot is to take the time to look for pleasing compositions and think about what you want to achieve with your shot. Before making the photo, first mentally envision how you want the scene rendered as a print.
I chose to isolate a particular group of leaves and shot at a large aperture to get a nice dreamy feel to the photo. I also paid particular attention to what was in the background so that I would get a nice creamy bokeh. Below are some tips to get a photo with a nice out-of-focus background that I hope you will find useful.
1. Aperture. This is the setting that many of you probably already know and is most associated with getting a shallow depth-of-field (DOF). Using smaller f-numbers means your lens is at a larger aperture and this results in creating a shallower DOF.
2. Focal Length. Have you ever noticed how those Sports Illustrated covershots seem to have the players just pop out of the background? Some of that has to do with the focal length these photographers are using, usually in the 400 – 600mm range for outdoor sports such as football, baseball and soccer. Everything else being equal, the longer the focal length, the smaller the depth-of-field.
3. Subject to Camera Distance. Have you ever noticed the razor thin depth-of-field on some macro shots? This is because as the subject to camera distance decreases, so does DOF. If you really want to get that nice out-of-focus background, bring your subject closer to the camera.
4. Subject to Background Distance. If you want to really make your subject pop, just make sure that they are far away from the background. A bush 5 feet behind your subject will still have some definition whereas if you put that same bush 40 feet behind your subject, it will render as a creamy green background with no clear definition.
5. Sensor Size. If both are framed identically with the same aperture, full frame sensors will give you a shallower DOF compared to a APS-C or crop body sensor by a factor of around 1 1/3 stops. This extends down to 4/3″ and smaller sensors as well. The primary reason that point-and-shoot cameras are not able to get shallow DOF even at large apertures, is due to their tiny sensor sizes. This is one of the reason why professionals and advanced amateurs prefer full frame cameras such as the Nikon D600, D700, D800, D4, D3 and Canon 1Ds, 1Dx, 5D and 6D series of cameras.
Here is a resource that helps determine the depth-of-field that you might find useful. DOFMater is not only a great tool, but the website also explain some of the theory behind DOF.
Location
La Jolla Coastal Shoot
 Canon 5D Mark III, 24-70mm f/2.8L II USM at 24mm, f/16 for 5s at ISO 100, circular polarizer, 3-stop graduated ND filter
Background
One of the places I like to shoot most is the La Jolla coastal areas. There is no shortage of unique rock formations which make for interesting foreground objects. I have quite extensively shot the coastline from La Jolla Shores down to Windansea, but I have somehow managed to miss this particular spot until this past weekend. I must say of all the spots along the La Jolla coast, this one is the most interesting and dramatic.
How to get this type of shot
Like almost all landscape shots, the best time to shoot is either 30 minutes before sunrise/sunset or 30 minutes after sunrise/sunset, or the so called Golden Hour. During this time you get great color and direction of light as well as avoid the overly contrasty conditions of shooting during the middle of the day.
Must have equipment to successfully shoot during these times of day are a sturdy tripod and a set of graduated neutral density filters. The tripod is necessary due to the long shutter speeds you will be using due to the low amount of light during the Golden Hour and the large f-stops typically used in landscape photography to get the entire scene in focus. The graduated ND filters are necessary to balance the exposure of the foreground with the bright skies. Due to the limited dynamic range of even today’s best sensors, shooting these scenes without a graduated ND filter would result in either a blown out sky or an underexposed foreground. An alternative to using filters is HDR or High Dynamic Range techniques of blending multiple exposures into one. I like to get my images in one shot and get it right in camera, so elect to use filters instead of HDR, but either technique will give great results when performed properly.
I was drawn to the composition since the rock formation served to lead the eye into the scene. I also like the movement in the water on either side of the rocks and I was also careful to include the left most rock formation in the frame since it gave the image more dimension and depth. An aperture of f/16 was used since the foreground was only about 2.5 feet from my camera and I wanted to have everything from the rocks to the horizon in focus. The image was taken around 15 minutes before sunset. Although there was a marine layer present, there were still some high clouds that were lit up by the setting sun.
Location
Poway Rodeo
 Canon 5D Mark III, 70-200mm f/2.8L IS II USM at 150mm, f/2.8 for 1/640s at ISO 100
Background
When we got to the rodeo I was surprised at the sheer amount of amateur photographers in the stands. There were literally 20-25 shooters with about 7-8 wielding Canon 100-400mm 4.5-5.6L IS USM lenses with another 5-6 using 70-200mm lenses in different varieties. There was also a mix of the Canon Big Whites along with those shooting with consumer lenses. Bodies ranged from 1-Series down to Rebels with the majority shooting with 7Ds with a few 5D Mark IIs and IIIs mixed in.
The large turnout of photographers, at least in part, was because Canon was one of the sponsors of the event and they teamed up with a local camera shop to provide instruction and use of some of Canon’s super telephotos. This also explained the dearth of Nikon shooters, of which I only counted three. The official event photographer, though, was a Nikon shooter and he was shooting inside the arena with a pro body and a 70-200mm f/2.8G AF-S VR II lens.
How to get this type of shot
I have shot enough outdoor action to know that shooting back lit subjects is not only a challenge for exposure, but also can render AF less effective. So prior to purchasing the tickets, I Google Mapped the rodeo grounds to determine which direction I should be shooting to get front lit subjects. It also helped out that Canon was sponsoring a photo workshop, since they would most likely be situated where their class would get the best photos. This turned out to be the South bleachers near the West facing gates.
 Canon 5D Mark III, 70-200mm f/2.8L IS II USM at 200mm, f/2.8 for 1/640s at ISO 100
When shooting an event such as this one, and in general really, I shoot in Manual mode and set my exposure prior to the start of the activities and keep it there for the entire event only periodically checking exposure throughout the day and adjusting if necessary. This is advantageous since panning is required to track the action and as the backgrounds behind your subjects change, so can your camera’s meter reading. Shooting in Manual mode ensures that I get good subject exposure despite what might be in the background that might influence the meter reading as would be the case if I were in one of the automatic modes such as Shutter or Aperture Priority.
 Canon 5D Mark III, 70-200mm f/2.8L IS II USM at 200mm, f/2.8 for 1/640s at ISO 100
The general rule for sports photography is to use a shutter speed of at least 1/500s in order to ‘freeze’ the action. To get this shutter speed I shot wide open at f/2.8 (this also helps with subject isolation due to the shallow depth-of-field). Since I was using a polarizer, this aperture gave me a shutter speed of 1/640s to 1/800s at ISO 100 depending if I was shooting North or South. In hindsight, I should have either taken the polarizer off, thus giving me 3 – 4 times the shutter speed I was at, or bumped up the ISO along with the shutter speed. Even at 1/800s, at 100% view, there is still some motion blur on the subjects.
 Canon 5D Mark III, 70-200mm f/2.8L IS II USM at 200mm, f/2.8 for 1/640s at ISO 100
I shot most of the day at high shutter speeds to try and freeze the action. For the barrel races (photo below), I wanted to capture the speed at which these ladies were riding, so I slowed my shutter speed down to 1/100s and panned my camera with the rider. This resulted in an image with the horse and rider against a streaking background. The image is more dramatic IMO and gives a better sense of speed than a shot of the horse and rider frozen.
 Canon 5D Mark III, 70-200mm f/2.8L IS II USM at 200mm, f/6.3 for 1/100s at ISO 100
Later in the afternoon when the structures on the west end of the arena started to cast a shadow on the gates, I had to switch to spot metering and put my camera into Shutter Priority mode and Auto ISO since the riders went in and out of shade and full sunlight (photo below). Using the center spot to meter the scene allowed me to get proper subject exposure despite the rapidly changing conditions.
 Canon 5D Mark III, 70-200mm f/2.8L IS II USM at 200mm, f/3.2 for 1/500s at ISO 160
Location
Geisel Library – University of California San Diego Campus
 Canon 5D Mark III, 24-70mm f/2.8L II USM at 35mm, f/8 for 1/13s at ISO 100
Background
After getting shutout of the Salk Institute due to restricted access during non-business hours (I really want to shoot Salk and it is one of the remaining iconic San Diego places that I have yet to shoot!) I went across the street to UCSD to make a photo of their unique Geisel Library.
How to get this type of shot
I arrived approximately 40 minutes before sunset, but due to the library being situated at a slightly lower elevation compared to the buildings to the west, it was already partially in the shade.
Given the defined lines and symmetry of the building, I wanted to shoot it at one of its axis to get a mirror image of the structure. To exaggerate this effect I composed the library in the center of my frame. I chose to shoot on the diagonal plane since it looked more dynamic compared to shooting this building straight on. My aperture was set to f/8, which gave me plenty of depth-of-field since I was at least a couple of hundred feet away. Due to the building being in partial shade and the foreground being in complete shade, I had to use a 3-stop graduated ND filter to balance the exposure.
For whatever reason, when I got home and was working on the photo, the color image just did not work for me. I tried to process the image in a variety of different ways but was not satisfied with how the image was looking. Perhaps it was the fact that the structure was only partially bathed in semi-golden light or maybe it was something else, but the image just didn’t have the impact I was going for. In the end I converted this photo to black and white, and guess what? I liked the result.
A reader asked for the color version, so I updated the post with the version below.
 Canon 5D Mark III, 24-70mm f/2.8L II USM at 35mm, f/8 for 1/13s at ISO 100 (Color version)
Location
Wavecrest Woody Shoot – Encinitas Calfornia
 Canon 5D Mark III, 24-70mm f/2.8L II USM at 70mm, f/8 for 1/50s at ISO 100, circular polarizer
Background
This post is a slight continuation to my post yesterday regarding my photos on display at Westfield UTC. The same client had expressed interest in doing a surf themed 5 photo collage so my wife and I headed down to Moonlight Beach in Encinitas to attend Wavecrest, the largest Woody gathering in California to grab some photos. Due to the requirements of the display cases, the photos are cropped as a square.
For those not familiar, Woodies have a strong connection with the surf culture of the 60’s here in California. They can be seen in various movies including classics such as “Ride the Wild Surf” (1964) and “Beach Blanket Bingo” (1965) with surf boards either attached to the roofs or sticking out of their tailgates. They have also been immortalized in songs such as “Surf City” by Jan & Dean and “Surfer Girl” by The Beach Boys.
 Canon 5D Mark III, 24-70mm f/2.8L II USM at 41mm, f/8 for 1/125s at ISO 100, circular polarizer
How to get this type of shot
Shooting events like this is always challenging. You have to deal with what I call the “Three C’s”, Crowds, Clutter and Crappy light.
When you go to the largest Woody show in California, you have to expect crowds. Our plan was to show up early before the swell of people and hopefully get some clean compositions. Unfortunately, this did not work out and we arrived shortly after 10am where there were already hundreds of people and an average of 4 to 5 individuals checking out each of the cars. Similarly, “clutter” is everywhere, either in the form of other cars you are trying not to include in your composition, tents people set up to stay cool or the various flags, poles, advertisement banners and houses from the surrounding areas.
When faced with this type of situation, it is often best to shoot from a low perspective so that you can use the sky and palm trees as your background. You also have to learn to be patient and wait for the right time to trip the shutter when everyone has left the frame. In addition, you need to really pay attention to what is both in your background and at the edge of your frame. Carefully look to see what is behind what you are shooting. See that ugly red tent? Moving over a couple of feet or shooting from a lower angle will probably get rid of it. “Hey that looks like a cut off arm in my shot, and why is there is a floating head in my photo?”. Pay attention to your borders and don’t trip the shutter unless you are 100% happy with what is in the frame and maybe just as important, what is not in your frame.
 Canon 5D Mark III, 24-70mm f/2.8L II USM at 70mm, f/8 for 1/100s at ISO 100, circular polarizer
This takes us to the final and probably most important “C”, crappy light. These events almost always take place during the middle of the day, and in this case from 8:30am to 3:00pm. I had to deal with the harsh mid-day sun for most of my shoot. The number one weapon I found to combat this is through the use of a polarizer. Depending on the angle of the sun in respect to your camera, you can darken your skies and, most importantly, reduce or eliminate reflections off of the objects you are trying to photograph. In this case, photographing shiny cars and polished surfboards and getting good color saturation would have been next to impossible without the use of a polorizer. Generally speaking when I am shooting outdoors during the day, I have a polarizer screwed to the front of my lens about 80% of the time.
There is one drawback to using a polarizer though, and that is the 1.5 – 2 stop reduction in light. This of course means you are using a 3 to 4 times slower shutter speed compared to shooting without a polarizer, and if you are shooting hand held as I was doing this day, and at large f-stops without the benefit of an image stabilized lens, it can lead to some less than sharp photos.
If you are going to purchase a polarizer, I recommend using a high quality multi-coated one such as the B+W Kaesemann or what I use, the Hoya HD2 line of circular polarizing filters. Granted, they are not cheap, but the final output from your lens is only as good as its weakest link, and there is no sense in putting a $30 polarizer on the front of your $2000 optic.
 Canon 5D Mark III, 24-70mm f/2.8L II USM at 31mm, f/8 for 1/125s at ISO 100, circular polarizer
Location
My First Large Scale Display

A couple of months back, I was approached by the Director of Marketing at the Westfield UTC regarding licensing one of my photos for a large scale commercial display. Now that the project is complete, I can share the results with you.
The Westfield UTC is an upscale mall located in the University Town Center area adjacent to the University of California in San Diego and the beach enclave of La Jolla. The mall recently underwent a major renovation and art is a major theme. The plans called for a large five panel photo display of scenes in La Jolla and the surrounding coastal areas.
I was initially approached due to the client’s interest in my Scripps Pier image (probably my most popular photo as I have been asked for license of this file on numerous occasions). A Google image search had led the client to my blog. This really emphasizes the necessity for good Search Engine Optimization or SEO. Had I not tagged my photos with good search terms (with the help of my fabulous wife who, in her previous life, was in marketing ) and made my photos “visible” I would never have gotten this sale. Even if you do not intent to license or sell your photos, good SEO leads to more hits to your blog from search engines such as Google, Yahoo and Bing and is worth doing and doing well.
When I met with the client and was shown how large my photos were going to be printed, I have to admit, I was a little nervous. The panels were approximately 94″ x 94″ or nearly 8 feet across and high and were going to be displayed where the viewing distance was going to be measured in feet and not yards. I stand around 5’11” so you can get a sense of scale of the display with me in front of it.

Before I fully committed to the project, I did tons of research to determine if the images from my 5D Mark III would hold up to such an enlargement, and it turns out that they do. So just think about this the next time you are wondering if your modern DSLR is capable of even 11″ x 14″ prints (which seems to be a questions that comes up often on forums). Viewing at around 1-foot distance, there is minor pixelation (remember the majority of these prints are a square crop and if the original 3:2 aspect ratio would have been preserved, it would have represented a print measuring 141″ or nearly 12 feet on its long end!). At a viewing distance of 3-feet, the image looks very clean and at a normal viewing distance of 6+ feet, the images look spectacular.
Prints this large also emphasize something I am a huge proponent of, getting it right in camera. With the really high megapixel cameras these days, it is easy to perform sloppy compositions (tilted horizons are a huge pet peeve of mine) and to simply say “I’ll just crop or fix it in post processing”. The images used for this display are either not cropped at all (aside from what was required to fill the display windows) or cropped very minimally to fix minor leveling of the horizon line. Due to the final output size of these images, I needed all 22 megapixels my camera was capable of producing. So next time you think, “I’ll fix it in post processing”, resist the urge as you never know when you might need all those megapixels.
For those interested in the technical details of these images, I shot them as RAW files then imported them into Lightroom where I performed global adjustments. Next I imported them as 16-bit TIFFs into Photoshop where I applied additional processing. Finally, the files were saved as uncompressed TIFF files (around 250 MB each) and the printer was able to work with these files for the final output. Email me using my Contact Me page if you want more specifics.
I know I have a few local San Diegans who follow my blog. If you get a chance, please go and check these images out in person. They are in the general area of where the Nordstroms is located and the display is right next to the Restoration Hardware. For those non-locals following my blog, you can check out the individual photos from the 5 photo collage using the links below.
Windansea Beach
La Jolla Cove Staircase
The Children’s Pool at La Jolla Cove
Scripps Pier
La Jolla Cove Sunset
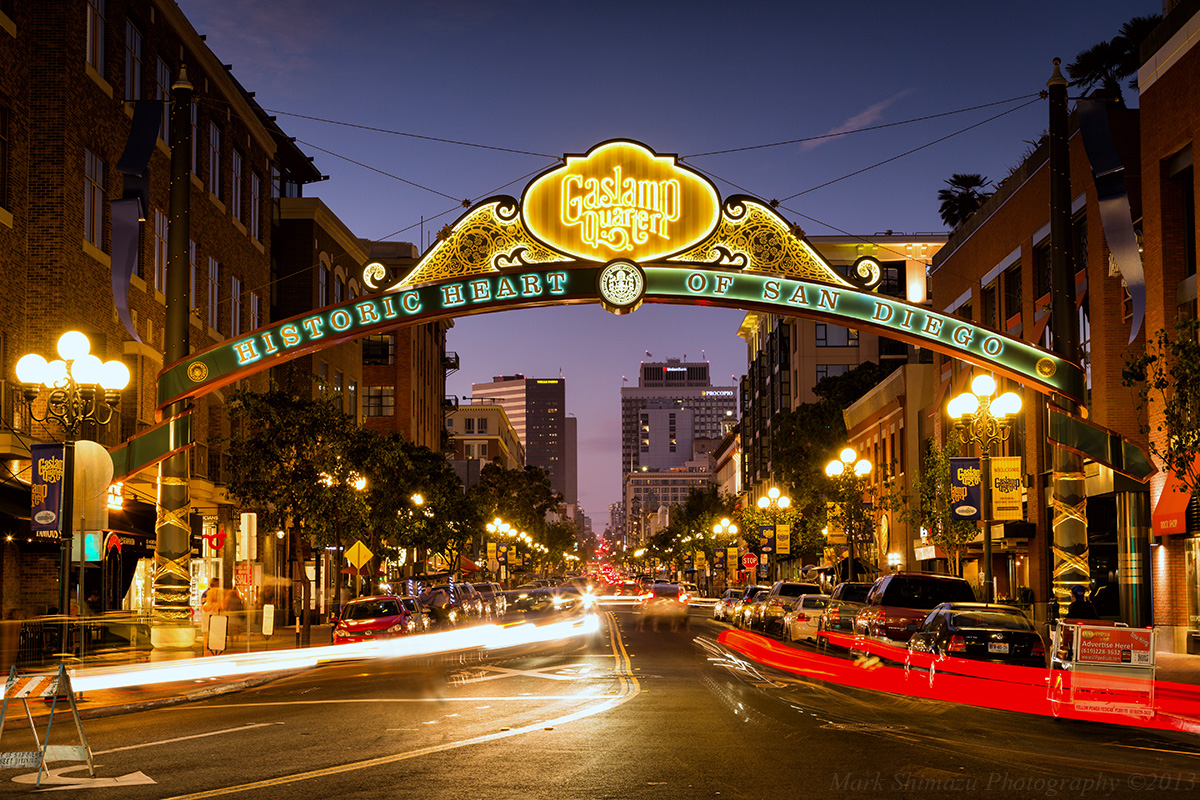
San Diego Neighborhood Signs
 Canon 5D Mark III, 24-105mm f/4L IS USM at 65mm, f/11 for 6s at ISO 100
Background
These images are a continuation of my series on San Diego neighborhood signs. The first shot of the series was “The Boulevard” on El Cajon Blvd and can be seen is this post. There are several of these signs that either are prominently featured on an island divider or span the entire street. A complete list of signs in San Diego can be found here. So that makes four down and one more to go for a certain project I have in mind.
 Canon 5D Mark III, 70-200mm f/2.8L II IS USM at 135mm, f/22 for 30s at ISO 100
How to get this type of shot
Patients and timing are critical in getting a successful shot. For both the Gaslamp and Northpark signs I wanted to include the activity of the city represented by the streaking car head and tail lights. These light streaks not only serve as leading lines into the image, but also add a dynamic element of activity in a cityscape. To get both incoming and outgoing cars, I had to time my shots with the traffic signals so that cars were going in and out of the frame during the exposure. This took several tries to get the most pleasing streaks.
Shooting at the right time of day is also key. For the Gaslamp shot I wanted to feature the downtown buildings so I shot slightly after sunset so that some light remained in the sky which also served to light up the surrounding buildings with natural light. Some neighborhoods are more photogenic than others and those signs surrounded by strip malls are best shot at night when the signs light up and the rest of the city falls into darkness. The Boulevard and Northpark shots are examples of this.
Encinitas is home to the world famous surf spot Swami’s, so I wanted to capture this photo during sunset with blue skies and clouds in the scene to get the “Sunny California” vibe. I also framed the shot to include some palm trees to give the image a sense of place for those that are not familiar with the location of Encinitas.
 Canon 5D Mark III, 24-105mm f/4L IS USM at 58mm, f/11 for 1/15s at ISO 100, circular polarizer
Location
Festival of Sail – San Diego – California
 Canon 5D Mark II, 24-105mm f/4L IS USM at 58mm, f/8 for 1/125s at ISO 100
Background
The Festival of Sail is an annual event that takes place on the San Diego Bay adjacent to Downtown during Labor Day Weekend. Numerous tall ships are both on display and are also available for people to take a ride on. These magnificent ships take you back to a time when wind power was the only way to propel your ship. I missed this event for the past two years, but thought I would share a couple of photos from 2011.
How to get this type of shot
Due to the time of day I was there, I was forced to shoot in mid-day sun, but fortunately the day had some nice clouds between the areas of blue sky so I could get photos which were not too contrasty. I used a polarizer to darken the sky and to make the white sails of the ships stand out. I brought my wide angle lens to get some interesting compositions aboard the tight confines of the ship, a standard zoom lens as well as my telephoto zoom to get closer to the action of the staged cannon battles.
For the first image I wanted to layer the image to show the docks with the cannons in the foreground and the ship in the background. The second image was a classic use of leading lines. Due to the nature of the ships sails, all lines (ropes) converge into the central mast. I felt that the peripheral lines added interest to the scene and the white sails contrasted well with the blue skies.
 Canon 5D Mark II, 24-105mm f/4L IS USM at 35mm, f/8 for 1/320s at ISO 100
Location
Meet Mark
Mark is a scientist living in San Diego, CA. He loves being outdoors and traveling. Always with him is his Canon EOS 5D Mark III. Mark has been shooting since 2009. Join him as he documents his travels and everyday life. Learn more about Mark click here.
RSS Subscription

